Earlier in the week, my friend Breeze and I made flower crowns. Here's a picture of Breeze rocking the bare wire frame while Facebooking on her phone.
We found this to be an easy project, so of course I overcomplicated it. For your sanity, however, I'll replicate the easy version here. This is by no means rocket science, this is just the way we put them together. You can do this in wildly different variations.
MATERIALS:
thicker gauge wire, long enough to wrap around your head 2-3 times with extra
thicker gauge wire, long enough to wrap around your head 2-3 times with extra
green florists tape
pliers/wire cutters
scissors
pretty fake flowers!
Also, I found a glue gun to be incredibly helpful. It's not necessary, though. You can find all of these materials in a craft store like JoAnns or A.C. Moore.
 |
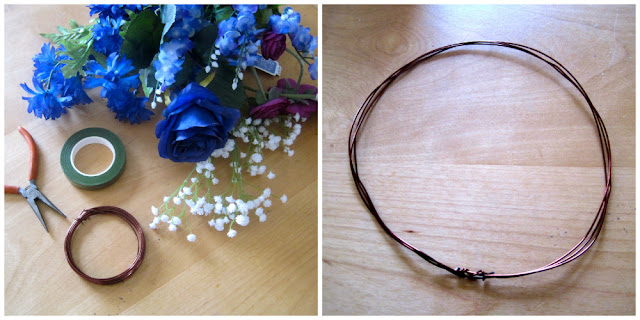
| 1. the flowers I chose 2. my wire halo |
First, you want to wrap the wire around your head once, making it sit the way you'd like the final crown to sit. Add a little extra, as your flowers are going to make it a little tighter. Coil the wire around 2 or 3 more times until you have a halo, as pictured above. I slightly wove mine, just to keep them together better. Then, we made sure to coil the ends tightly around, with no wires poking into our heads, to keep it tight. Go in with the wire cutters if you have to, but I think it's better to wrap all the extra to make sure it's a stable crown.
 |
| 3. pre-cut tape and 4. pre-cut flowers |
Through trial and error, I found it to be much easier when I had a stock of pre-cut tape and flowers on hand. Also, make sure to give your flowers some stem when you cut them, otherwise it's going to be pretty tough to tape them to the wire.
Floral tape is kind of a twerp. At least, the kind that we bought. (read: budget version) It doesn't particularly have a "more sticky" side and you need to really pull it tight as you wrap so it sticks to itself. Which causes untold woe when it unravels as you're trying to wrap. Hence my comment earlier about hot glue... when you're in a tight space or the tape just won't stick, just glue it. Save yourself some temper tantrums. No one should ever be angry while making flower crowns.
So: arrange, wrap, arrange, wrap, glue... etc until you've gone around the crown. I was obsessive about angling them the right way so I ran off to a mirror every five seconds to check and therefore took a great deal longer to finish than Breeze did, and hers still looked better. Learn from my mistake and just relax and let them sit naturally.
I ended up deciding I only wanted flowers on the front and sides, so I just wrapped the back with floral tape. Breeze went all the way 'round, and it looked ballin'. Mine was pretty cool too, though, so it's all opinion on how far around you chose to go.
 |
| annnnd the finished product, plus the huge mess at the end. |
We also cut off the greenery on our fake flowers to add to the crowns. Any cool leaves or whatnot that are a part of your flower bundles really help fill in and add a little interest. It's completely optional, though, 'cause who knows, maybe you just want flowers.
In the end, this was an incredibly fun project, and helps me pretend it's already spring (which, in Maine, it most certainly is not). Grab a couple friends and trek to the craft store and find all the pretty flowers and then wrap wrap wrap and then ta-daa! Flower crowns.


This is so pretty! Definitely trying this... could be a cute Easter idea for my niece :)
ReplyDeletexx L
An Easter flower crown would be a perfect idea! Also, spring has officially sprung on like, wednesday. There are at least a zillion reasons to make flower crowns.
DeleteAlso thanks so much for my first comment! There might have been excited squealing involved. If you do try out the flower crown, shoot a picture my way. I'd love to see what other people do. =]